Week 11: Print Preparation

Question/ Assignment 1 – Printing checklist form
Design your own printing checklist form


You can find my Printing Checklist Form here (PDF file):   printingchecklistform

Question / Assignment 2 – 20 page magazine style brochure

Design a simple dummy 20-page magazine style brochure combining dynamic typography and photography. You can use placeholder text for body copy. For your magazine, use a spot varnish for the cover and design it using two spot colours.
Make use of your checklist that you designed and prepare the file for print.
Decide what paper weight and type you will use. 
Decide what type of binding you will use, for example, saddle stich, perfect bind, etc. (See the printing terms link.)
Submit the print-ready file packaged from InDesign as well as a print-ready PDF.

Make sure to include the instructions (like spot varnish, paper choice and binding) in the file.


I am having some trouble uploading Q2  to wordpress :S But I will try again a little later, or tomorrow if I can’t make it happen tonight.


Sources:

http://ljdesignstudio.com/ultimate-design-checklist-for-print-files

http://www.charlotteswebstudios.com/article.php?ttd=1&ark=7

http://www.companyfolders.com/blog/print-ready-checklist?goback=.gmp_107023.gde_107023_member_224765629

http://creativepublic.com/printing-checklist.php

http://www.robinsdesign.com/design_tips_printing.html

http://www.kalkuler.com/kalkulatorer/farger/PMSfargekart.php#.UziN2vl_u1Q

Week 8: Know your camera – Digital SLR

After reading the appropriate section in your prescribed textbook From Snapshots to Great Shots (by Jeff Revell),please answer the following questions:

  1. Name all the functions / buttons on the front of your camera
  2. Name all the functions / buttons on the back of your camera
  3. Explain how you would set the correct ISO
  4. Explain how you would change the aperture
  5. Explain how you would change the shutter speed

1 and 2 – Functions/Buttons on my camera:

My camera is a Canon EOS 500D (US name is Canon Rebel T1i).

CANON BUTTONS FUNCTIONS 1
CANON BUTTONS FUNCTIONS 2
CANON BUTTONS FUNCTIONS 3

3 – How to set the correct ISO:

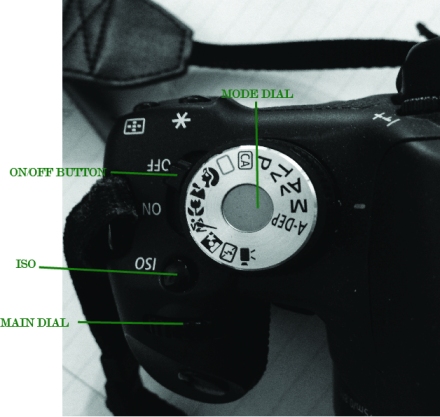
Have the camera turned on, and then press the ISO button on the top of the camera. I would then use the main dial to select my ISO. When I have chosen the correct ISO for the environment I am shooting in (outside/inside/daylight/lowlight etc.), I usually press set to lock in my chosen ISO number, though you can also just lightly press the shutter button to lock in your choice.
To ensure the best quality for my photographs I would try to keep the ISO number down whenever I can, as a big number could cause the images to look a bit grainy. However, a high ISO could be a great help when shooting at night, in poor lighting, and in dark spaces.

4 – How to change the aperture:

Aperture is also known as f-stop, and determines how much light passes through the lens at once. When the camera is turned on I would use the cross keys to I get to the f-stop on the display, and then I would adjust my f-stop by using the main dial. When I have chosen the number I want I either press the set button or press down slightly on the shutter button. The F-stop can only be controlled manually when using some of the custom/creative shooting modes (you choose your shooting modes by twisting the mode dial. The basic shooting modes are all pre-set/automatic), mainly the AV and M shooting modes.

5 – How to change the shutter speed:

The shutter speed controls the length of time that light is allowed to hit the sensor. Manual changes to shutter speed can only me made in the shooting modes M and TV on the CANON EOS 500D. I would change the shutter way the same way as with the f-stop. Use the cross keys to locate the shutter speed on the display, and then use the main dial to adjust. You can then either press the set button to save, or slightly press down the shutter button.
It can be smart to keep in mind that when adjusting the shutter speed, one should also adjust the aperture, and vice versa.

Week 6: Colour Effects

As an addition to what we have learned about colours this week we have also slowly started to get to know Adobe Photoshop and how to work with colours within this program.

One of the tasks we were to complete was to try out different colour effects on one of our own images, as a means to get to know photoshop and colour use better.
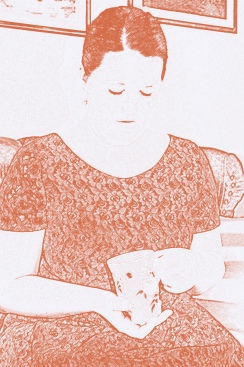
We were to try out three different given effects and also to decide on one effect ourselves. The three decided ones were: Create and “Andy Warhol” look, Apply a sepia look, and to split toning of the image. I decided for the fouth effect to try out charcoal.

Original

Original

Andy Warhol Inspired

Andy Warhol Inspired

Sepia

Sepia

"Freestyle" - Charcoal

“Freestyle” – Charcoal